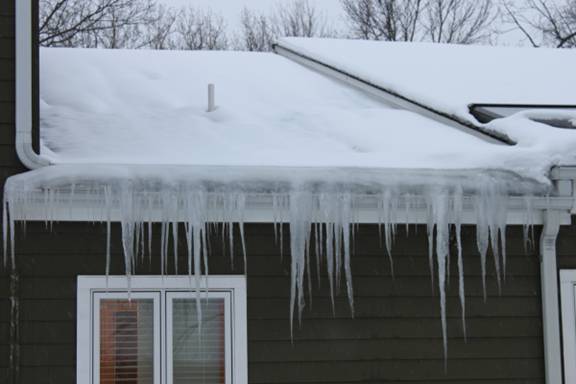
THE DREADED MASSACHUSETTS ICE DAM
Every few winters Central Massachussetts is plagued by ice dams. They generally appear after a heavy snowfall followed by freezing and thawing on the roof surface. Because ice dams occur on roofs buried in snow, few people actually see them, let alone understand their causes. The only time people think about them is when water finally makes its’ way into the living area. At this point the damage has been done.
What are Ice Dams?
Ice dams are literally dam-like buildups of ice on a roof. They normally occur at the edge of the roof but can occur higher up under certain circumstances.
The ice itself is not a problem. What is a problem is that melt water from the snow can form a pool behind the dam. Most roofs are very effective at shedding water. Very few roofs, however, are designed to cope with pools of water. Water backs up behind the ice, seeping up under the shingles until it finds its way through the roof to the attic and living areas below.
While usually temporary in nature, the massive roof leaks the dams cause can wreak all kinds of havoc with wiring, drywall, paint, carpet, flooring and interior furnishings. Ice damming can also cause problems for your exterior siding and the wood and insulation behind it.
The Havoc Ice Dams Wreak
Contrary to popular belief, gutters do not cause ice dams. However, gutters do help to concentrate ice and water in the very vulnerable area at the edge of the roof. As gutters fill with ice, they often bend and rip away from the house, bringing fascia, fasteners, and downspouts in tow.
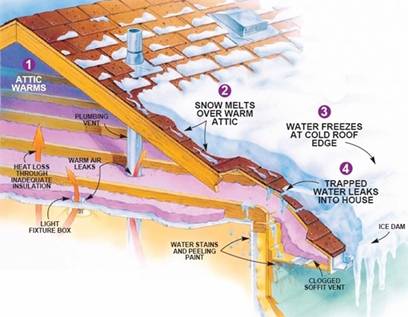
Roofs leak on attic insulation. In the short term, wet insulation doesn’t work well. Over the long term, water-soaked insulation remains compressed, so that even after it dries, the R-value is not as high. The lower the R-values, the more heat lost. This sets up a vicious cycle: heat loss-ice dams-roof leaks-insulation damage-more heat loss! Cellulose insulation is particularly vulnerable to the hazards of wetting.
Water often leaks down inside the wall, where it wets wall insulation and causes it to sag, leaving uninsulated voids at the top of the wall. Again, energy dollars disappear, but more importantly, moisture gets trapped in the wall cavity between the exterior plywood sheathing and the interior vapor barrier. Soon you can smell the result. In time, the structural framing members may decay. Metal fasteners may corrode. Mold and mildew may form on the surface of the wall. Exterior and interior paint blisters and peels.
What Causes Ice Dams?
Ice dams occur most often when we get heavy snow followed by below freezing temperatures, but they can occur with just an inch or two of snow. Some part of your roof warms up enough to melt the snow. The melt water flows down to another part of the roof that is cooler, and the water refreezes. The ice forms a small dam that builds up slowly as more melt water refreezes. Eventually, water backs up behind the dam and works its way up under the shingles until it begins to leak through the roof into the living space below.
There are four main causes of ice damming, and the latter three we can actually do something about.
• Weather
• Household heat escaping to the attic
• Uneven roof temperatures
• Roofing underlayment that water can penetrate
Preventing Ice Dams Ice dam prevention is best achieved in three ways:
• Attic insulation
• Attic ventilation
• Proper re-roofing
Ice Dams: Fact vs. Fiction
Fact: Ice dams can occur with virtually no snow on your roof. It’s a question of ice accumulations. It takes very little actual moisture to form ice dams. Even a dusting of snow can create a problem. Of course it is most often the case the thick snow accumulations create ice dams more quickly.
Fiction: Gutters have something to do with ice dams. The truth is gutters have nothing whatsoever to do with ice dams. If your home is prone to ice dams you will get them either way. If you have gutters they will fill with ice and provide a foundation for the ice dam above. If you don’t have gutters, the ice dam simply builds on the cold edge of the roof. We provide ice dam removal for many homes each year that do not have gutters.
Fact: Gutter systems can be damaged by gutter ice. We see it every year. A section of otherwise fine gutter is either on the ground or hanging pathetically off the edge of the roof, filled with ice. Fresh water ice weighs about 60 pounds per cubic foot and gutters are not designed to tolerate that sort of load. It’s important to initiate gutter ice removal sooner, then later.
Fiction: When it comes to insulation, the more the better. Improperly insulated homes are just as bad as under insulated homes when it comes to ice dams and roof ice We have fixed countless bad insulation jobs for this reason. Specifically, we frequently find insulation done in such a way as to inhibit proper ventilation. Moreover, if you don’t address air leakage into the attic or rafter spaces, all the insulation in the world won’t prevent ice dams.
Fact: You can see ice dams from the ground. Not always. It’s true that you can usually spot a monster very easily. You can see the two foot icicles and the little glacier on your gutter. The sneaky ones are usually above skylights or in roof pan areas far out of sight. Sometimes ice dams grow up valleys and on top of dormers making it almost impossible to identify from the ground.
Fiction: Ice dams need to be thick to cause a problem. Ice dams as thin as one inch can cause big problems. A good general rule is that the steeper your roof, the thicker the ice dam has to be to cause problems. On lower pitched roofs even a thin ice dam can hurt.
Fact: The leaking caused by ice dams may not show up right away. It would be nice if water stains or mold manifested immediately upon entering your home but it simply does not work that way. Often the water that ice dams push into homes travels around wall and ceiling cavities, trapped by vapor barriers and other materials until it finds the path of least resistance to escape. By the time you see water inside, it’s usually been there for a while.
.
Solving the Problem
The way to stop ice dams from forming is to keep the entire roof cold. In most homes this means blocking all air leaks leading to the attic from the living space below, increasing the thickness of insulation on the attic floor, and installing a continuous soffit and ridge vent system. Be sure that the air and insulation barrier you create is continuous.
Attic Insulation
While some warm spots on the roof occur because of sunlight, most are caused by heat escaping from the heated portions of the house. Most homes have attic insulation, but in many cases there isn’t a sufficient amount or the insulation has settled, been compressed, gotten wet, or has otherwise become less effective. In many homes the problem is breaks or gaps in insulation due to light fixtures, pipes, settling, or foot traffic. The goal is to have an attic that stays very close to outdoor temperatures. Pull-down attic stairs and other access doors are often quite leaky.
In many homes, heating ducts run through the attic to reach other parts of the home. If the ducts themselves have a leak or if they are insufficiently insulated, the leaking heat can cause an ice dam.
Some older homes have bathroom or kitchen exhaust fans that blow warm and/or moist air into the attic. These exhausts can be a problem because, in addition to leading to warm spots, the moisture reduces the effectiveness of the rest of the attic’s insulation. All exhaust ducts should be vented to the outside.
Attic insulation requirements
For most homes located within a snow belt zone, a minimum attic insulation level equivalent of R – 49 is required in order to provide sufficient level of installation for your home. Most homes built before the 1980s will not have sufficient levels of attic insulation, nor will they have sufficient levels of wall insulation for that matter.
Maintaining sufficient levels of insulation in your home is not only helpful for the ice dam prevention, but it is also great for attaining higher level of energy efficiency in your home. By properly insulating your home you will decrease your heating and cooling costs, which in turn will lower your home’s carbon footprint and help you save money off your utility bill.
How to measure attic insulation
You can measure the thickness of your attic floor insulation with a simple ruler. For example, If you find that you have 8 inches of existing fiberglass blanket insulation covering your attic floor, then multiply it by 3.14 to derive its R-value.
By multiplying 8 inches of fiberglass blankets times 3.14, we get approximately R – 25 value. It means that will will have to add another 7 to 8 inches of insulation to bring in up to the required R -49 insulation value.
Sealing off the air leaks in the Attic
Aside from additional insulation, you will want to identify and seal off any holes, air leaks and drafts in the attic. Once you find the air leaks, you can seal them off with caulk, spray foam, or weather stripping.
Attic Ventilation
Even a well-insulated attic is likely to have some heat escaping from the house. It is also likely to be affected unevenly by sunlight. Proper ventilation can smooth out temperature variations and largely eliminate the risk of ice dams.
Attic ventilation is usually the easiest way to prevent ice damming, yet it is the step most often omitted. Most attics are designed to take advantage of the fact that heat rises. Air must be able to circulate freely under the roof.
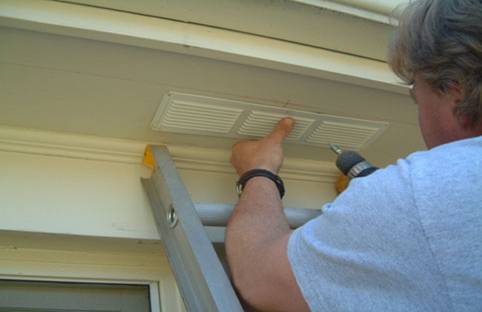
In a typical home, there is a series of vents under the soffits or eaves. These vents are the intake vents in your attic’s ventilation system. People sometimes cover these up on the outside, not fully understanding their importance. Sometimes these vents get clogged with dust, vines, leaves, or other debris. If you don’t have these vents, have a carpenter or roofer install them. If you do have them, make sure they are clear of debris.
To be effective against ice damming, your attic ventilation needs to have a two-part system:
• Intake vents
• Exhaust vents
Warm air rises and escapes out of the exhaust vents, drawing fresh, cool air into the intakes. Ideally, this prevents any part of the roof from having the opportunity to become warmed by air escaping from the home below. Good ventilation also helps minimize variations in temperature due to sunlight.
While nearly all attics rely on intake vents at the eaves, the exhaust vents take any number of forms. Most homes are equipped with a ridge vent, which is a long, often continuous vent that runs the length of the roof’s ridge (the roof’s peak). “When soffit to ridge ventilation is added to an attic with other vents in place, such as gable end vents, roof louvers, wind turbines, or power fans, you must remove or block off the other ventilators. When installed properly, ridge and soffit systems draw air in the bottom (soffits) and out the top (ridge). Other open ventilator holes in the roof or gable will shortcut the low to high draft and diminish the ventilation effectiveness.”
Many homes with adequate vents have poor air circulation due to obstructed air paths. This typically occurs near the eaves when new insulation is added or old insulation settles in a way that blocks the flow of air from the intake vents to the rest of the attic. There should be at least an inch and a half of space between the insulation and the roof inside the attic at the eaves. There should be no insulation on top of the intake vents themselves.
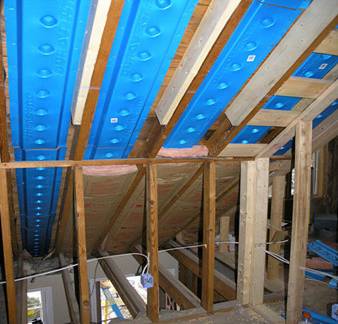
These blue baffles are proper vents allowing for soffit to ridge ventilation unobstructed by the insulation.
Other options for dealing with the Ice Dams
Ice Melting Cables
There are some special ice-melt cables you can install on top of the shingles at eaves of your roof. Needless to say, these special ice-melting cables will have to be properly grounded and turned on manually after a heavy snowfall. You will have to remember to turn them off once the snow clears, or they will burn out.
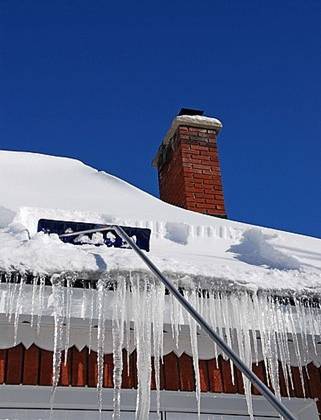
Snow rakes
You can also use the snow rakes to help you get rid of the snow at the eaves of your roof after a snowstorm. Be very careful if you have to use a ladder to reach the roof. You will want to make sure that your ladder is properly placed and secured before climbing it.
Ice Belt
Ice belt is a 3′ wide aluminum metal edging. It is placed along the edge of the roof and should help shed snow and ice off the roof before it has the chance to buildup.